|
|
Bucket furnace Last updated: 05 Dec 2016 |
Here's the rundown on how the furnace was made. Any of the pics can be clicked for a full size version.
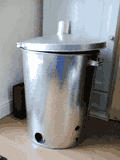 |
11-Jul-02: Here's the starting point - a metal garden incinerator bought from HomeBase for �14.99. It looked like a sensible buy at the time, but realistically, it's just too big. I may chop it up or buy something smaller. |
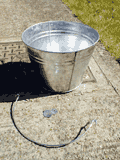 |
14-Jul-02: Gave up on the idea of chopping up the
incinerator. Instead, it seemed easier to get hold of a couple of
buckets. The bucket as shown will be the base, the top will be an
identical bucket turned upside down. The idea for this came from Backyard
Metalcasting, the "2 bucks furnace".
The capacity of each bucket is 3 Imperial gallons (14 litres), in the picture I've taken the angle grinder to the rivets on the handles - they won't be required. |
 |
This is the top bucket. For the
flue, I'm using a diameter of 66mm as this is the same as the width of a
330ml soft drinks can which will be used as a former later on.
A 66mm circle (approx 2.5") has been drawn onto a sheet of paper and taped to the bucket to provide a guide. |
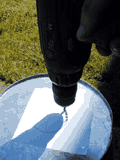 |
With the paper guide in place, it's easy to just drill some small holes. After drilling, some side cutters were used to "join the dots" and let the centre piece fall out. |
 |
Using a multi tool, the hole can be cleaned up nicely so that the Pepsi can is a secure fit. |
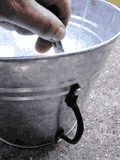 |
Some iron handles are being added, each are
held on with a pair of M6 x 40 bolts.
I didn't fancy trying to bend them to fit horizontally round the tight curvature in case they gave way when I was trying to pick the top up. Equally, I didn't want the handles on the top of the can with all the heat pouring out, hence the weird vertical mounting on the sides. |
 |
To ensure the refractory stays in, the
inside of the bucket is being wired up. 2.5mm holes are drilled in
the side of the bucket, the wire is good old coat hangers that have been
chopped up.
There are four vertical wires which will later join to more wire bracing as the level gets built up. |
 |
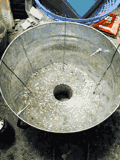
Here's the refractory mix. 2 parts
Silica Sand, 1 part Fireclay, 1 part Perlite and just enough water to wet
it. Gingery uses just fireclay and sand, Backyard Metalcasting are
using fireclay, sand, perlite and portland cement. This is somewhere
in the middle, and to be honest, a total experiment - if it ends up a
total disaster, then I may have to rework the formula...
Note the Pepsi can sitting in the bucket which will be used as the flue former. It has been filled with refractory and baked in the oven, so it's rock hard - it would just crush otherwise. |
 |
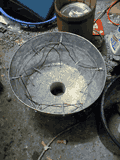
Here's the first layer of refractory,
approx 80mm (3") thick. It has been tamped down very hard to
get rid of any large air pockets. The
soft drinks can was gently twisted out straight away so it appears the
refractory is packed fairly well with enough water to hold itself
together.
I will leave it for a few days to cure before putting in the coffee can former and more refractory. It's being sprayed with a water mist from a recycled bottle of bathroom cleaner every 12 hours. I guess after about 3-4 days it will be solid enough to start building up the next level of refractory. |
 |
20-Jul-02: More bolts, more coat
hangers. After 5 days the refractory in the base had still not dried
out, so it went in the cooker at 150C for 4 hours to harden it up.
There is plenty of wire in there, it needs all the support it can get - remember this is the lid of the furnace and will be upside down when installed. |
 |
A coffee can surrounded by 1/4" corrugated card. Not the tidiest job in the world, but it will do the trick. |
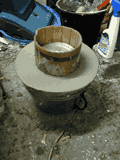 |
All filled with refractory now, and
floated off to give a nice smooth finish. Maybe I should have taken
the lid off the coffee tin first to make it easier to get out...
The batch of refractory for the sides was made up with a little more water than the base, it will probably shrink a little more when it dries out. |
 |
21-Jul-02: The furnace top has been
in the cooker at 40C for 12 hours, followed by a run up to 150C over 4
hours. A small charcoal fire has been lit to burn off the remaining
cardboard and tape.
It looks like the cardboard former sprung out while the refractory was setting, and there are a few cracks - other than that, it's OK. |
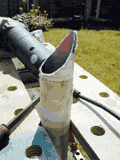 |
28-Jul-02: One of the fun bits is
making the tuyere so that it will fit the chamber properly. I made
up an excel spreadsheet to calculate the shape, graph it, and the graph
then scaled to fit the exact dimensions.
Taping the paper form on makes it easy to grind the pipe to the right shape. |
 |
2:00PM Our friend the coffee
can once more. Instead of wrapping it with thick cardboard, I tried
about three turns of polystyrene insulating material that has a foil
backing.
When making the lid, the moisture in the refractory soaked into the cardboard and took the tape off it, so I'm hoping this all works out. |
 |
4:00PM Even with the tuyere
hanging out, the whole lot fits in the cooker nicely. Set for 100C
and bake for a little while.
Actually, 100C cracked it big time. It was patched then dropped to 70C, then 95C and slowly from there up to 150C. |
 |
8:00PM It's looking good, the ali has started melting and
the fork is being pre-heated to pull some of the slag off. ps: I
don't pick up the fork by hand! It's picked up with a RoboGrip while
I'm wearing welding gloves.
The tiny little Clairol hair dryer is providing ample air to get things hot enough. I was worried it would be a little too weedy. |
 |
9:30PM The light is fading, I deliberately took this
picture with the flash switched off and the hair dryer maxed out - click
on the pic to see the full sized version and check out the little charcoal
sparks.
Regrettably, the base of the "steel soup can" crucible melted through shortly after this picture was taken. |
 |
29-Jul-2002: This is the leftovers of 40 soft drinks cans. Each empty can weighed 14g, the two items pictured (courtesy of the cake tin mould) weighed 280g, so 50% of the cans are slag. |
| 15-Sep-2002: Update - the inside of the furnace has been relined and coated with ITC-100. This amazing stuff means the outside of the furnace is can be touched whereas before you would have burnt your fingers off... | |
| 7-Sep-2003: Update - the little furnace is still going strong, you can see a video of it in action on the cast iron page. | |
 |
19-Jun-2004: A couple of years use (and melting some steel by mistake) has taken its toll on the little bucket furnace. |
 |
The top is all broken away, and this picture of the base inside shows molten iron fused into the base. It will all be chipped out today and rebuilt using proper industrial refractory materials over the next couple of weeks - stay tuned... |
Mk II version with Industrial Refractory materials |
|
 |
14-Aug-2004: All of the damaged refractory has been removed just leaving the shell of the two buckets and the reinforcing wire for the lid. These will be rebuilt using 1600C castable refractory from John Winter. This stuff isn't cheap, but it should do a much better job than what was in there before. |
 |
The first lot of refractory is now in - this stuff sets solid in only an hour or two, so the sides can be built up much quicker than with the home made refractory that was in there before. |
 |
You've heard of the 'lost wax' technique, this is the 'lost glass' technique. It's a bit of an experiment, I'm not sure if the glass will break out cleanly. |
 |
Looks good - the glass broke out with very little effort, so this bizarre method will be used for the base as well as the top. |
 |
21-Aug-2004: All done, the furnace is now having it's first firing. It was left on a low heat for 2hrs until the steaming stopped, then ramped up to a higher temperature that you can see here. It will now get a coating of ITC-100 just to finish the job off. |
These pages are maintained by Duncan
Munro. All content on this site is Copyright ©2002-2026 Duncan
Amplification.
Warning: These pages consist of images and descriptions of equipment
which can reach high temperatures creating hazardous and potentially dangerous
situations. These pages should not be taken as a step by step guide on how
to construct any items or carry out any particular procedure, nor should any
references to safety contained herein be taken to guarantee safety in all
situations.