|
|
Clay crucible casting Last updated: 05 Dec 2016 |
 The steel crucible I use for
melting aluminium has carried out around 30 melts now and is looking the worse
for wear.
Clay crucibles can be an expensive hobby - especially if you want a large number of them. As I'm a beginner at all this, I'm reluctant to screw up commercially made crucibles at �30+ a time. Inspired by this mad scientist page, it seemed like a sensible idea to try and cast some crucibles.
When handling the ceramic materials shown below, ensure you stick to any safety precautions as the dust is very fine.
 |
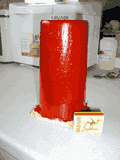
12-Oct-02: First off, a wooden pattern is needed to drop in the
plaster. 6 spruce planks were glued together, turned to a taper
profile and painted.
This one represents about the highest diameter I can turn on the Myford ML7 and still clear the cross slide. If I need to make anything bigger than this I'm going to have to pester someone with a wood lathe. The box of matches gives an idea of size. Diameter is tapered with 93mm bottom, 105mm top with a height of 187mm. Thats 3 5/8", 4 1/8" and 7 3/8". With a 10mm wall thickness the working capacity should be around 0.7 litres representing 1.9kg/4.1lb aluminium 5kg/11lb cast iron, and 6kg/13.2lb brass - plenty for smaller items. I know the crucible will shrink from the mould, but I'm not sure how much at this stage, so the capacities about may need to come down slightly. |
 |
Armed with the pattern and a casting bucket, some potters plaster has
been mixed up. This is a special type of plaster designed for slip
casting which sets quickly and has the additional property of being
porous. You can get this from ceramics supply places, I got mine
from Brick
House Ceramic Supplies (UK).
The wooden pattern has a strip of mahogany screwed to the top to keep it level when the plaster is poured in. |
 |
The plaster will try to displace the wooden pattern out of the bucket,
so a 25kg sack of molochite has been placed on the top to keep things
steady while the plaster sets.
It should set enough for the pattern to be pulled out after about 45-60 minutes. Heat will be generated by the plaster as it sets. |
 |
The mould was tried out after about three hours, but was not a complete
success. Leaving the mould in the bucket was a bad move as the sides
of the crucible cracked away from the base as it dried.
The mould has now been removed from the bucket - time to try again... |
| Latest update ---> | This is not working out. After another try, the clay is drying out
but has cracked badly.
Fixes required: Rather than try to make up my own slip recipes, I will go and buy some ready made. It might be a good idea to make the mould in two parts as I have not successfully removed a crucible from the mould yet! |
These pages are maintained by Duncan
Munro. All content on this site is Copyright ©2002-2026 Duncan
Amplification.
Warning: These pages consist of images and descriptions of equipment
which can reach high temperatures creating hazardous and potentially dangerous
situations. These pages should not be taken as a step by step guide on how
to construct any items or carry out any particular procedure, nor should any
references to safety contained herein be taken to guarantee safety in all
situations.